Overview
A wobbly or rubbing wheel can make even the best ride feel rough, slow, and unsafe. Whether it’s caused by loose spokes, an uneven rim, or just miles of use, learning how to true a bike wheel is one of the most valuable skills a cyclist can have.
In this detailed guide, we’ll show you step-by-step how to identify the type of wobble, use a truing stand (or your bike frame), adjust spoke tension correctly, and prevent future issues.
By the end, you’ll not only know how to get your wheel straight — you’ll understand how to keep it that way.
Why Wheel Truing Matters
A true wheel is more than just about appearance — it’s about safety, efficiency, and ride quality.
When a wheel is out of true, it can cause:
- Brake rub on rim-brake bikes
- Poor disc rotor alignment on modern setups
- Uneven spoke tension leading to broken spokes
- Premature rim wear and bearing stress
Even small deviations can cause long-term issues if ignored. Truing ensures even tension across all spokes, keeping your wheel strong, smooth, and long-lasting.
Understanding Wheel Truing
A properly trued wheel has three critical alignments:
- Lateral True – The rim runs straight side to side (no wobble).
- Radial True – The rim runs round (no hop or flat spot).
- Dish Alignment – The rim is centered between the hub flanges.
Most minor issues involve lateral truing, which can be fixed in minutes once you understand how spoke tension affects the rim.
Tools You’ll Need
Having the right tools makes the process smoother and more precise. Here’s what you’ll want:
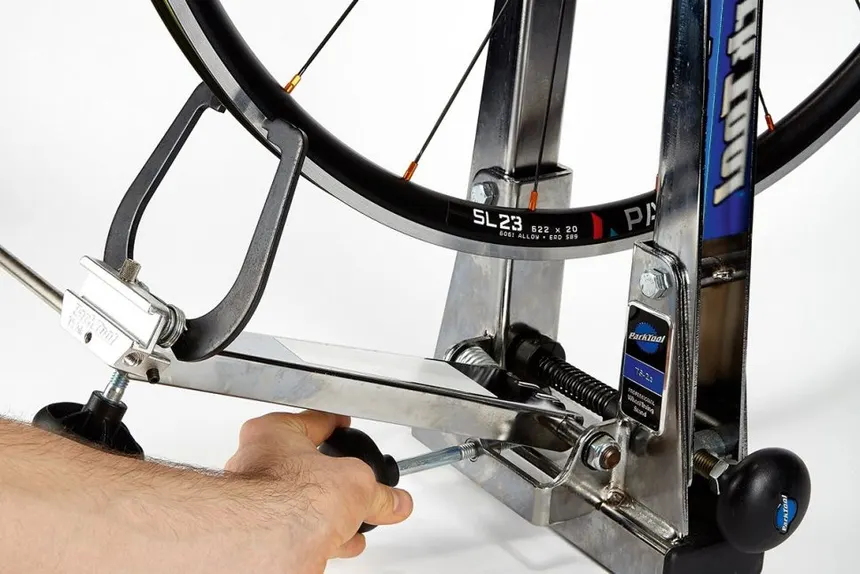
- Truing Stand (like Park Tool TS-2.3) — optional but ideal for precision
- Spoke Wrench — correctly sized for your spoke nipples
- Dishing Tool — checks rim centering
- Nipple Driver or Small Screwdriver — for initial adjustments
- Tire Levers and Valve Core Tool (if removing tire or tube)
- Marker or Zip Tie (for improvised truing in bike frame)
- Lubricant or Light Oil — a drop on each nipple for smooth turning
- Good Lighting and Patience
Pro Tip: Use color-coded spoke wrenches so you never strip a nipple — Park Tool SW-0, SW-1, and SW-2 cover most common sizes.
Step 1: Preparing the Wheel
Before touching a spoke wrench, set yourself up for success.
- Clean the Wheel – Remove dirt, grease, and brake dust. You need to see spoke heads and rim clearly.
- Inspect for Damage – Look for cracks, dents, or bent spokes. A cracked rim can’t be safely trued.
- Deflate Tire (Optional) – Some prefer to true with tire on; others off for better visibility. Removing it can help spot radial hops easier.
- Mount the Wheel – Use a truing stand if available. If not, flip your bike upside down and secure the wheel in the frame.
Attach a zip tie or tape a pen to the frame or fork to act as a reference gauge.
Step 2: Identify the Problem Area
Slowly spin the wheel and watch how the rim passes your reference point.
- Side-to-Side Wobble (Lateral) → Tighten spokes on the opposite side of the bulge.
- Up-and-Down Hop (Radial) → Tighten spokes equally in the low area.
- Off-Center Dish → Adjust tension evenly on one side until centered.
Mark problem spots with a piece of masking tape or a sharpie for reference.
Tip: Work in small sections — about 3–4 spokes at a time — and remember “righty tighty” means pulling the rim toward that spoke’s side.
Step 3: Understanding Spoke Tension
Each spoke acts like a spring pulling the rim toward its side. The goal is balanced tension across all spokes.
- Tightening a spoke pulls the rim toward that side.
- Loosening a spoke releases tension, allowing the opposite side to pull back.
- Every ¼ turn makes a noticeable difference.
Think of the rim as floating between equal forces — adjusting one side means compensating somewhere else.
Step 4: Lateral Truing (Side-to-Side Wobble)
This is the most common adjustment.
- Find the point where the rim moves closest to your reference gauge.
- Locate the spokes on the opposite side of that wobble.
- Tighten those spokes ¼ turn each.
- If the wobble is severe, loosen a few on the opposite side slightly to balance the correction.
- Spin the wheel again and check progress.
Repeat this process gradually until the wheel spins true.
–> Avoid tightening more than ½ turn per spoke at a time. Over-tightening causes uneven stress and risk of breakage.
Step 5: Radial Truing (Roundness)
Once the wheel runs straight laterally, check for vertical hops.
- Watch for sections where the rim dips closer or further from your gauge.
- Low spots: Tighten pairs of opposing spokes equally.
- High spots: Loosen pairs of spokes slightly.
You’re aiming for smooth, even tension that brings the wheel round without affecting side-to-side true.
Work in 3–4 spoke groups, and make very small adjustments — ⅛ to ¼ turn at most.
Step 6: Check the Dish
A properly dished wheel has its rim perfectly centered between the hub flanges.
- Use a dishing tool (or flip the wheel in the stand).
- If the rim moves closer to one side when flipped, that side’s spokes need loosening, or the opposite side needs tightening.
On rear wheels, expect the drive side to have higher tension due to cassette spacing. That’s normal.
Step 7: Stress Relieving the Wheel
This is a critical step most beginners skip.
After major adjustments:
- Grab pairs of parallel spokes and squeeze firmly.
- This settles the spokes into place and relieves wind-up from tightening.
- Spin the wheel again — small corrections may be needed afterward.
This step helps prevent the wheel from going out of true after your first ride.
Step 8: Final Checks
Before calling it done:
- Spin the wheel and ensure brake clearance is even.
- Check spoke tension by sound — pluck each spoke like a string.
- Higher pitch = tighter spoke
- You’re looking for even tone across the same side of the wheel.
- Confirm that all nipples have some visible thread engaged — if not, the spoke may be too long or short.
Once everything feels balanced, your wheel is ready for the road or trail again.
Common Mistakes to Avoid
- Overtightening: Leads to cracked rims or broken spokes.
- Skipping Dish Check: You can have a “true” wheel that’s still off-center.
- Ignoring Loose Spokes: They cause uneven tension and further untruing.
- Using the Wrong Wrench Size: Strips nipples and ruins truing accuracy.
- No Stress Relief: The wheel will immediately go out of true on the first ride.
How Often Should You True Your Wheels?
There’s no single rule, but as a guideline:
| Riding Type | Suggested Truing Frequency |
|---|---|
| Road Cycling | Every 6–12 months |
| Gravel / Adventure | Every 4–6 months |
| Mountain Biking | Every 2–3 months |
| E-Bike / Cargo Bike | Monthly or after big impacts |
Also check tension after major crashes, tire changes, or spoke replacements.
DIY vs. Professional Truing
| Option | Pros | Cons |
|---|---|---|
| DIY at Home | Saves money, great learning experience | Requires patience & tools |
| Bike Shop Service | Professional accuracy, tension balancing | $25–$60 per wheel typical |
| Hybrid Approach | DIY small tweaks, shop for full rebuilds | Best long-term maintenance plan |
Even if you learn to do it yourself, having a shop periodically tension-balance your wheels extends rim life significantly.
Upgrading Wheel Components for Easier Truing
If your wheels are prone to loosening or untrue frequently, consider:
- Brass Nipples: More durable than alloy; resist rounding off.
- Double-Butted Spokes: Flex more evenly, reducing stress.
- High-Quality Hubs: Maintain even dish and tension.
- Tubeless Tires: Reduce pinch forces on the rim under impact.
For riders upgrading wheels in 2026, brands like DT Swiss, Industry Nine, and Stan’s NoTubes remain the gold standard for truing stability and build quality.
How to True a Wheel Without a Truing Stand
If you’re on the road or just starting out, you can get surprisingly good results with your bike as the stand:
- Flip your bike upside down.
- Use the brake pads as visual guides.
- For disc brakes, zip-tie a marker to the chainstay or fork blade.
- Follow the same adjustment principles—small, even turns.
Bonus: In a pinch, you can even use a stick, tire lever, or spoke itself as a visual guide.
It won’t be micrometer-precise, but it’ll get you rolling safely again until you can use proper tools.
Preventing Future Wheel Issues
Once your wheel is true, protect your work by adopting these habits:
- Inspect Spoke Tension Monthly – Loose spokes are your biggest enemy.
- Avoid Pressure-Washing – Water intrusion weakens nipple threads.
- Torque Check During Tune-Ups – Add it to your regular maintenance routine.
- Ride Smoothly – Avoid curbs and potholes head-on when possible.
- Store Indoors – Temperature swings can cause spoke loosening over time.
Routine attention keeps your wheels strong and reduces shop costs long-term.
FAQ: Wheel Truing Basics
Q: How do I know if my wheel needs truing?
A: Spin it — if it wobbles against your brake pad or makes rhythmic noise, it’s time.
Q: Can I true a wheel with a broken spoke?
A: Yes, temporarily — but replace the spoke before doing a full true. A missing spoke affects overall balance.
Q: What’s the difference between truing and tensioning?
A: Truing focuses on straightness and roundness; tensioning ensures all spokes share even load. Both go hand in hand.
Q: Is it okay to ride with a slightly wobbly wheel?
A: Minor wobbles are safe short-term, but over time they can stress the rim or break spokes.
Q: Should I use oil or grease on spoke nipples?
A: A drop of light oil helps prevent corrosion and nipple binding, but avoid heavy grease—it attracts dirt.
Advanced Tips for Experienced Riders
Once you’re comfortable with basic truing, fine-tune your skills with these pro-level touches:
- Use a Tension Meter (like Park Tool TM-1) to balance spoke loads precisely.
- Check Spoke Wind-Up: After tightening, back off ⅛ turn to relieve twist.
- Balance Tension Across Flanges: Especially important for disc-brake wheels.
- Match Tone by Ear: Experienced mechanics can “tune” by sound like guitar strings.
- Finish with a Torque Check: Ensure all nipples are secure and even.
A well-trued, tension-balanced wheel not only rides better but lasts years longer.
Verdict: Why Learning to True a Wheel Is Worth It
Wheel truing may look intimidating, but once you understand how spoke tension shapes a rim, it becomes logical — even satisfying.
It’s one of those skills that transforms you from a casual cyclist into a confident, self-reliant rider.
Whether you’re fixing a simple wobble, building your first wheel, or keeping your e-bike rolling smooth, mastering this process gives you control over your ride’s most fundamental component.
In 2026, as bikes become more complex and specialized, wheel truing remains one of the last truly hands-on mechanical arts — and every cyclist should know how to do it.
Quick Reference Summary
| Step | Action | Key Tip |
|---|---|---|
| 1 | Clean & mount the wheel | Visibility is everything |
| 2 | Identify problem area | Mark wobbles or hops |
| 3 | Adjust lateral true | Tighten opposite side spokes |
| 4 | Adjust radial true | Tighten or loosen pairs evenly |
| 5 | Check dish | Rim centered between flanges |
| 6 | Stress relieve | Squeeze pairs to settle tension |
| 7 | Final check | Spin, listen, recheck tone |
Final Thoughts
Truing a wheel is about balance and patience, not brute force. Small adjustments, steady checks, and understanding how each spoke interacts will give you a straight, durable wheel every time.
It’s a skill that pays for itself quickly — and one that connects you to your bike on a deeper level.
So grab your spoke wrench, take your time, and give your wheels the care they deserve. A few millimeters of precision can make miles of difference on every ride.
Related Content:
- Best Budget Friendly E-Bike Brands
- How to Pack a Bike
- How to Wash a Bike Safely
- Best Comfort Saddles
- Best Mountain Bike Brands
Why Trust This Guide
BestBikeBrands is built by lifelong cyclists with decades of real-world experience — in the shop, on the trail, and behind the wrench. Our goal is simple: to help riders choose the best bikes and gear with confidence, backed by expert insights and hands-on testing. Learn more about us →